UniFi Security Surveillance Camera | UniFi NVR – Part 1
When I designed our family home here in Pakenham, I had quite a few things in mind and one of those things was to install network cabling throughout and home theater cabling in the lounge, before the plaster was installed on walls & ceilings.
Part of the cabling job was to run cables for future security cameras, alarm system, and electronic door systems (with RFID / HID) to the main front door and the door between the garage & house.
Unfortunately, I did run out of cabling to complete the runs for the cameras & alarm systems, which simply means I need to run them as I need them. I managed to get some of the security camera cabling installed at the build stage for the front of the house but that was it. Most importantly, all the home theater cabling and data cabling were installed during the house build as doing this after the face would have taken so much longer.
We never set aside a budget for the security cameras nor really knew five years ago what brand to go for, but recently we’ve been having some issues in our estate with crime on the rise – mostly either cars being broken into for items left in cars or people jumping fences avoiding the authorities after they have robbed the local bottle shop.
We had someone jump our back side fence to run through our back yard to get over the other side fence, and he wasn’t seen going past the next door neighbours for a couple of hours, but they denied his presence in their house at the time to the police.
The problem at the time for us was that a couple of the kids were in the back yard at the time, and anything could have happened – luckily nothing bad came of the situation for us, but you can just never be too careful!
So after this event, the lovely wife had decided enough is enough, she wanted some security cameras, (among other things), – a couple out the front, and a couple out the back. Great I thought – about time! I had originally planned like 16-18 cameras all up, but knew two things: 1) we don’t have the budget just yet for that many cameras, 2) not many systems designed for home & small business use can handle that many cameras, nor let you start small and expand. Installing a small system now and then replacing it entirely in a year or two was not my idea of a good investment!
Recently at work, we had sold a UniFi Protect camera system to a client of our’s and I got to be the lucky one to configure it! The boss already had one at home and was loving how good and easy it is to use.
I decided that since the majority of my home network is already UniFi based, it made perfect sense to continue down the UniFi line and go for their camera system, but being the amazing system it is, the standard four camera system does cost up to 50% more than a standard cheap Chinese style system your local sparky would sell you, but it offers ongoing support through both firmware updates & the amazing community forums, and greater security knowing its not susceptible to the same security holes like every camera here: https://www.insecam.org
The one common thing about security cameras, you need something to record the footage – usually referred to a DVR or NVR. UniFi is no different, you purchase one of their products such as the UniFi Cloud Key Gen 2 or the UniFi XG Server. I would liked to have gone for the XG server to ensure growth beyond my requirements, but again, cost was my issue here. I found out that you can actually build your own NVR server, install the UniFi NVR server software, and connect the cameras to it – perfect! I have a server running with more than enough available resources to spare to handle the workload and still have room to move. This will save me the purchase cost and the energy costs of additional hardware – making the initial outlay substantially cheaper, and as I already have a UniFi PoE switch with some spare ports, that’s another purchase I didn’t need to make now. All I had to purchase was the four cameras, and the rest was my time to configure the NVR server, firewall, and installation of the cameras!
Installation of the NVR
First thing’s first, before I made the purchase, I actually wanted to see if I could get the NVR software installed and working beforehand as I didn’t set aside funds to purchase the NVR box, but if this isn’t your thing, then you can skip this section and go down to the products section at the end.
I headed over to the Ubiquiti downloads page to see what versions of the UniFi Video software is available and for what platforms here. I saw they offer for Windows, Debian, and Ubuntu. I don’t usually work on Debian or Ubuntu systems – more of a CentOS guy myself, but I had already a couple of LTS versions of Ubuntu install images sitting on my hypervisor ready to roll, so I chose to go with Ubuntu 18.04 LTS x64 and the UniFi Video 3.10.11 software on top.
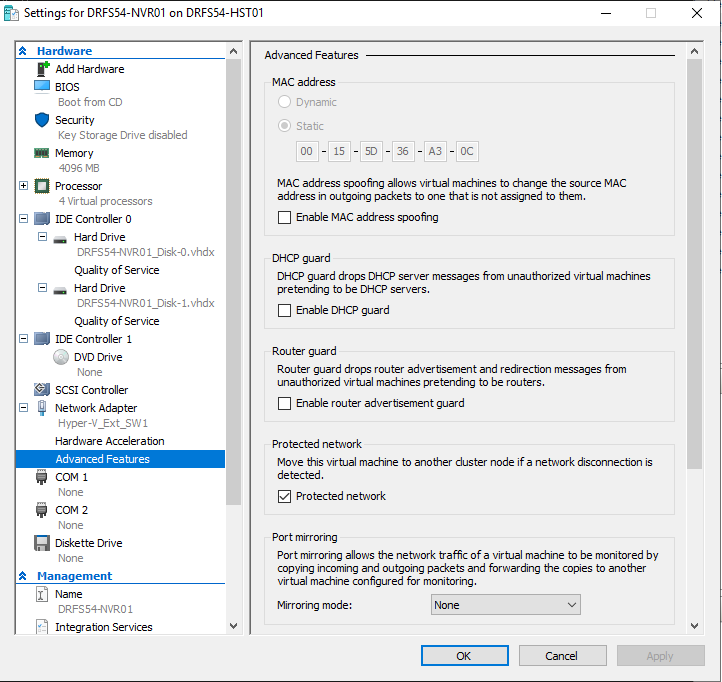
I created a new VM in Hyper-V, gave if 4 CPU cores, 4GB RAM, and a standard boot disk for the OS to live on, with the intentions of adding a second disk later for the footage to live on. I chose a Gen 1 VM just out of habit, boot and install Ubuntu basic server.
I used apt-get to install mc – I came from the good old DOS days and Norton Commander as my file manager, so Midnight Commander is a direct representation of this for me and never gets old.
One of the things I do as part of my best practices with VM’s is to boot it up, then very quickly shut it off before I have even installed it, so a MAC address is assigned to each NIC. Once this is done, I then change the MAC address settings from dynamic to static, so the MAC address is always the same – very handy if you move VM’s between hosts, or restore from Veeam backup (or similar). Every host and network device get’s a DHCP reservation on my DHCP server even if the IP address will be statically configured – just part of my practice – if ever the static information disappears, it will still be issued the same IP address as long as the MAC address stays the same.
I updated the package libraries
sudo apt-get update
Installed upgrades
sudo apt-get upgrade
Using wget, I downloaded the UniFi Video software:
wget https://dl.ui.com/firmwares/ufv/v3.10.11/unifi-video.Ubuntu18.04_amd64.v3.10.11.deb
I then proceeded to install the prerequisites for the software, this I had a little bit of trouble with after the fact as for some reason, which I can’t remember why now, but some of the packages didn’t install properly, so I had to go back and fix this.
sudo apt –fix-missing update
sudo apt-get -f install (also works)
Now to install the NVR software:
sudo dpkg -i unifi-video.Ubuntu18.04_amd64.v3.10.11.deb
We need to open port 7443 so we can login to the system with a browser to configure – preferable a browser on the same VLAN or subnet as the NVR
sudo ufw allow 7443
From here, I rebooted the NVR VM, optional, but I like to ensure a good functional clean boot post installation of software & configuration.
On the same VLAN as the NVR, I have a Windows 10 x64 VM also running in Hyper-V – primarily it was built so I can provide remote access to the solar installers should they require it, but as my cameras will be on this same VLAN, I can re-purpose this VM for getting the NVR configured.
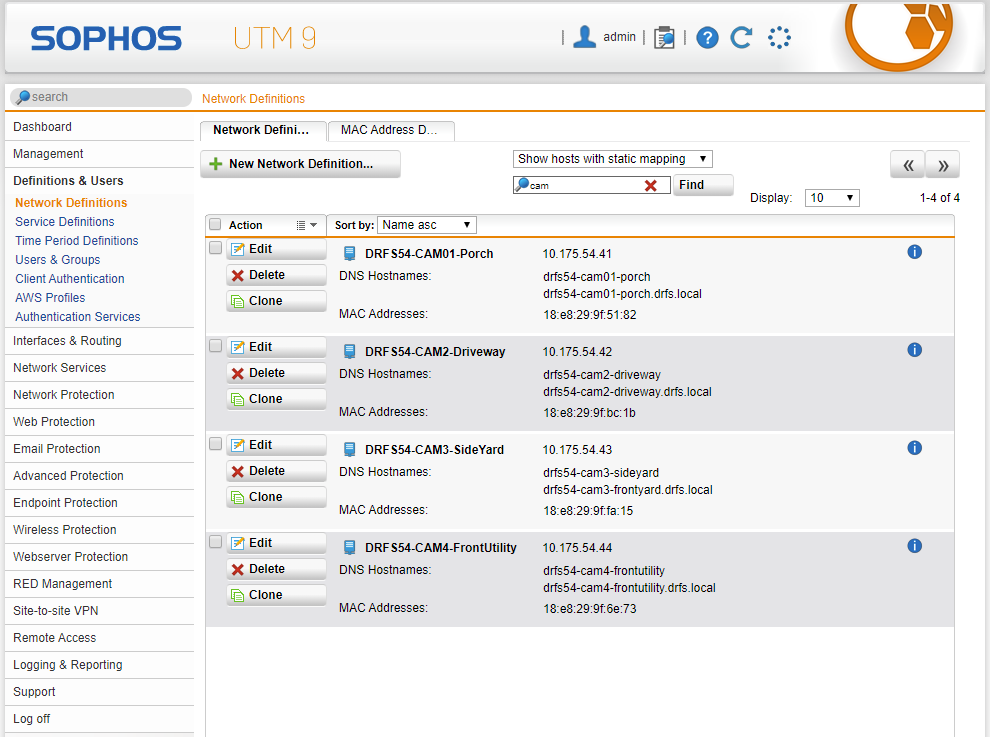
I have a pretty restrictive firewall in place and as part of my troubleshooting, I did find that certain additional outbound ports need to be opened on my router/firewall for the NVR to function properly:
- TCP:8848 Out
- TCP:8543 Out
- UCP:11143 Out
I connected to my NVR at https://10.175.54.24:7443 (this is the IP address I set for the NVR)
Now you just need to set a name for the NVR, timezone, etc – follow the bouncing ball to get setup!
I then proceeded to add a second disk for storage. In Hyper-V, I attached another IDE disk, gave it 1TB just for now, until I install the next four 2TB disks in a few weeks (waiting on SAS/SATA breakout cables to arrive).
I attached the disk to the VM and booted it back up, I then proceeded to format and mount the disk. I think from memory I used the below commands to get the second disk going:
sudo fdisk -l (to identify the physical disk: sdb)
sudo parted /dev/sdb
mklabel gpt
mkpart primary 0GB 4GB
quit
sudo mkfs.ext4 /dev/sdb
sudo mkdir /media/mediastore1
sudo mount /dev/sdb /media/mediastore1
Now we need this disk to always self mount on system startup, to do this we need to edit /etc/fstab – you can use your faviourite editor, such as nano or vi.
sudo nano /etc/fstab
You will need to add a line in there something like:
/dev/sdb /media/mediastore1 /ect4 default 0 0
This should normally work, but I had some issues and ended up having to mount the disk via its GUID.
To test:
sudo mount -a
Any errors will be displayed here.
Now we need to create a directory on the new drive for the footage to live and we need to make sure the NVR has write permissions to the folder.
mkdir /media/mediastore1/videos
sudo chown -R unifi-video:unifi-video /media/mediastore1/videos
Now we head back into the NVR configuration and set this as the recording path
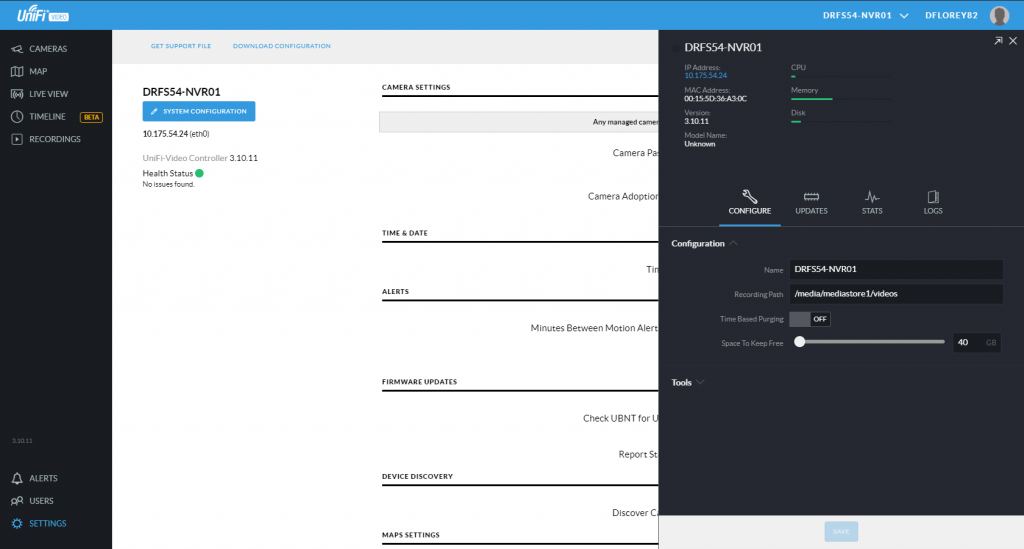
Add NVR to Your UniFi Account
If you don’t yet have a UniFi account, now is the time to create one over at https://account.ui.com/. Signing up for the account is free and optional. What it does give you is the easiest method to remotely access and view the system using your mobile phone while away from home.
Now, I have some pretty good antispam in front of my mail server and at the time of setting up my UniFi account, they were using MandrillApp for their new account and email password resets. UniFi didn’t have the reply-to field populated at all with anything, which is against email best practices, so the email wasn’t coming through, it wasn’t even showing up in the quarantine lists. I had to reach out to my antispam provider to see why the email wasn’t coming through, they provided the above information and put in a temporary whitel list for Mandrill’s IP addresses so the email would come through. I have provided this feedback to UniFi and have been informed the issue will be addressed in due course (whatever that means).
Once you have your account signed up and email verified, log back into the NVR and add your UniFi account. Now you can download the UniFi Video app from the Apple App Store or Google Play Store – sign in with your UniFi account and your NVR will be available to connect to.
A quick recommendation: Setup 2FA on your UniFi account and use the Microsoft Authenticator app to store the 2FA codes!
Adding Cameras
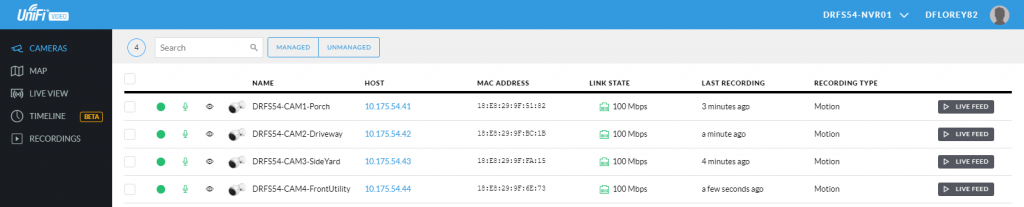
Adding cameras will be the easiest part of this job if you connected them up to the same network VLAN or subnet as the NVR. Once the cameras are connected to your PoE switch and the NVR is on the same network, the cameras will boot up and become visible in the NVR. Click on the camera, set the name of the camera (eg: Camera 1 or Front Door), enter ubnt in both the username and password field, then adopt the camera. The camera will install the latest firmware update, reboot, and become part of the NVR.
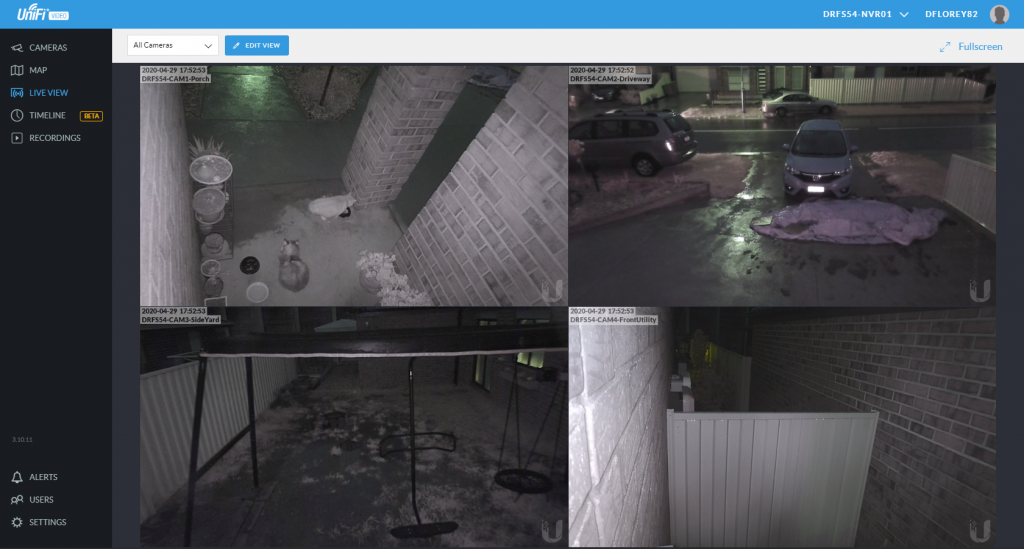
Once all the cameras are adopted, they will be available in the cameras list – like mine below…
Recording Setup
One of the reasons we have a system is to be able to record footage. With UniFi (and some others out there) there’s different recording options:
- Don’t record at all
- Always recording (fills up the disk quickly)
- Record on a schedule (eg, only when you’re not home during the day)
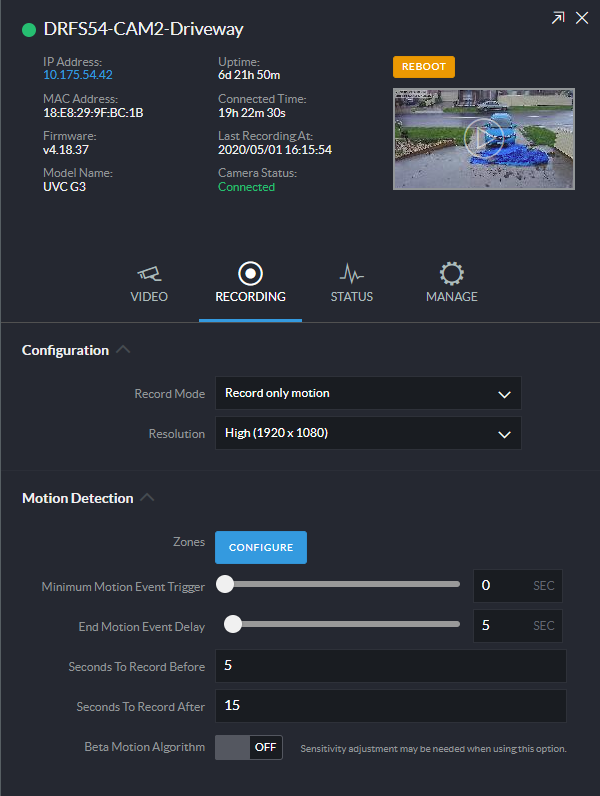
- Record on motion detection (my choice here – see movement and start recording)
In the cameras list, click on one of the cameras, click recording, and select the record mode. I selected Record only motion. Down below in the motion detection, I decided to have 5 seconds pre-recording and 15 seconds post recording. What this means the NVR constantly buffers five seconds of video. When motion is detected, the five seconds buffer is added to the start of the recorded video, followed by 15 seconds after the motion detection has stopped. This is to help prevent loss of frames in motion-detected video footage.
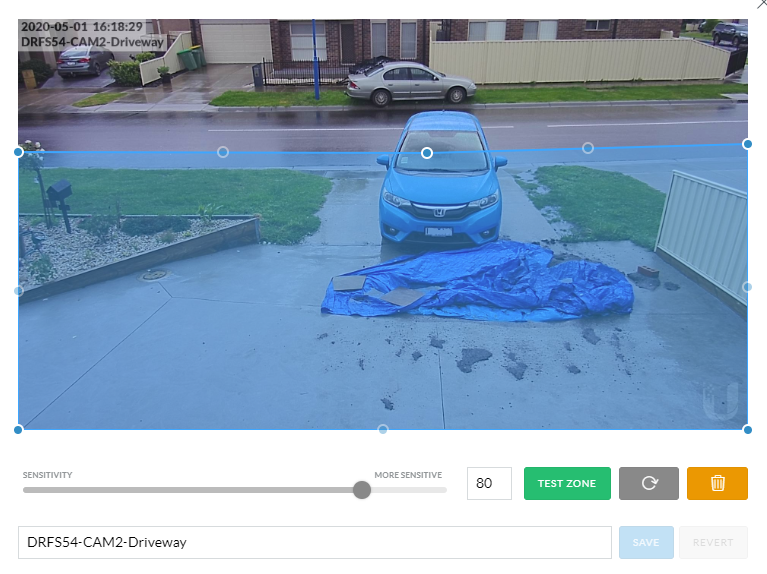
Next you can configure the motion detection zone. This is handy if you only want motion detection to only be detected in a certain part of the video frame. In my case, I don’t need activity on the other side of the street to cause motion detection. I just want the recording to start whenever that blue tarp starts flapping in the wind on my driveway, right? Click the blue Configure button next to Zones. Use the dots to change the shape and position of the recording zone. Everyting within the borders of the blue area that moves will trigger the motion detection system and thus trigger recording – like that blue tarp in the constant Pakenham breeze…
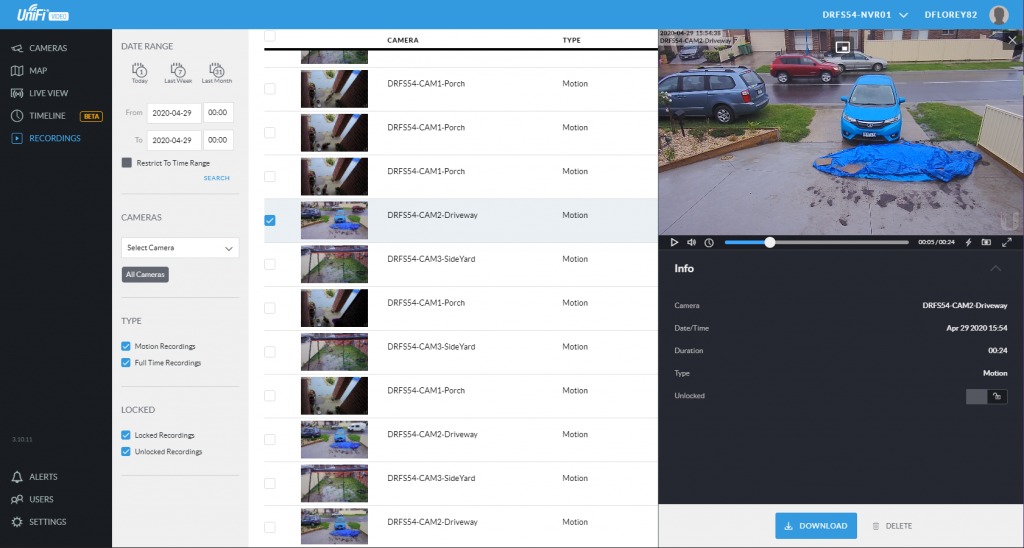
Save the changes, rinse and repeat for the rest of the cameras. Once the cameras have been recording, you’ll be able to go over and see all the footage recorded – nothing like the cats constantly moving about the front door trying to keep dry because they were dumb enough to wonder out there earlier before everyone went to work…
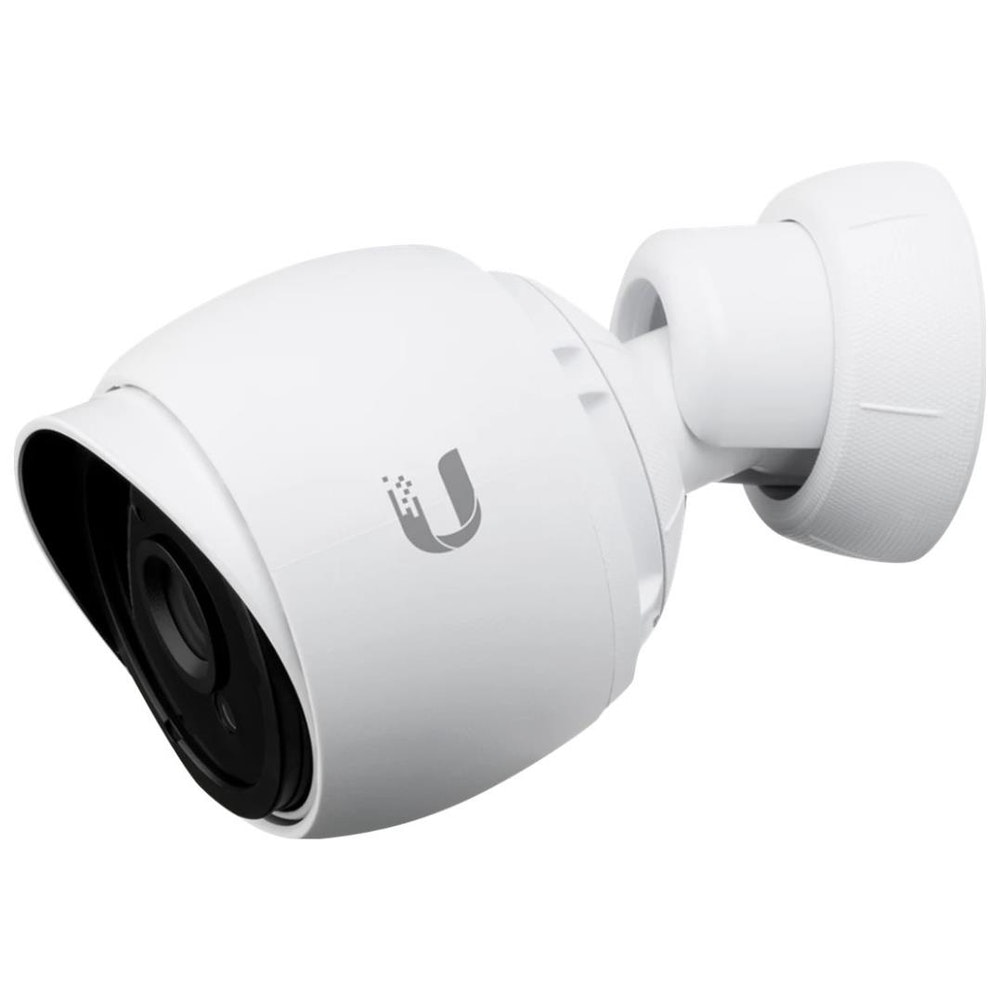
The night vision isn’t too bad on the G3-Bullet camera, but its definitely for short throw. UniFi do offer an optional add on IR Led ring to boost the night light a few more meters, otherwise buy their G3-PRO…
Equipment to buy for small setup
If you’re not like me with a 48 port PoE switch and a massive Hyper-V server with resources to spare, the prospect of building a NVR VM is not your ideal of a Saturday night, then fret not my dear reader, as you can just do the job using UniFi’s extensive range of off the shelf ready to use hardware. The thing to be mindful of is how many cameras you think you need now and how many you think you may need later on – this will for the very least determine which UniFi PoE switch you’ll purchase.
For the cameras and recorders, head over to: https://www.ui.com/products/#unifivideo
For switching: https://www.ui.com/products/#unifi
If you only need four cameras maximum and no more, then you can buy their 8 port switch model US-8-60W ( not the US-8 ), which 4 ports are PoE – meaning the cameras plug into the PoE ports to get power, then the NVR connects to a non PoE port along with your home router.
If you need more, say up to six, then you can go for the US-8-150W – which has 8 PoE ports, you would then connect six cameras, the NVR, and your internet router. Technically speaking you could connect eight cameras, then use SFP adapters to connect the NVR and router to the two SFP ports on the switch as well.
Going for more cameras? Like maybe fifteen or twenty? Sure thing, grab either a US-24-250W or if, like me, you need way more ports, a US-48-500W – see here!
Now for the recorder, if you’re new to UniFi and don’t have any of their equipment, then you’re best to go with the Cloud Key Gen2 Plus (not the Cloud Key Gen2). The Plus model doubles as the controller for all the UniFi networking equipment and a NVR for the cameras – as far as value goes, its cheaper than the standard NVR and has the controller (Cloud Key) bundled in there with it saving you from having to buy the Cloud Key separately and having to use up another switch port to connect it in.
An ideal setup with three outdoor cameras, with future expansion to six cameras, a switch and a recorder would require:
- Cloud Key Gen 2 Plus
- UniFi Switch US-8-150W
- 3x UniFi G3-Bullet
- Someone to run ethernet cabling and install it
Wrap up
So after my second UniFi camera setup, the first one running flawlessly for months, and mine for a couple of weeks now, I am happy with the outcome, the video quality is very usable, as it records in 1080p at 30 frames per second, the footage can easily be downloaded as standard MP4 files either on the web browser or on your mobile phone straight to your camera roll for evidence submissions.
I have started with four cameras, full well knowing and expecting that I will expand the fleet to cover all external areas of the property. I am confident that the system will handle this going forward and I have the flexibility to add more CPU and RAM resources to the system should the need arise.
Feel free to comment below any questions you may have.
Comments: 1
If you have any questions or want pricing & installer contacts, feel free to email me at david.florey@davidflorey.com.au